Run n8n and SearXNG Locally with Docker: Build Your Own No-Code AI Playground

We live in a world where anyone with a computer and an internet connection can access AI agents—often at no cost and running on personal machines. In this guide, you’ll learn how to set up a local no-code environment using two open-source tools:
- n8n: A powerful visual automation tool that allows you to quickly prototype and experiment without extensive coding knowledge.
- SearXNG: A privacy-focused metasearch engine that aggregates results from various sources. We will integrate it with n8n, enabling an AI agent to retrieve up-to-date web data.
Everything runs locally with Docker Compose, so there’s no need for sign-ups, payments, or data sharing.
This article is part of a series based on insights from my late-night experimentation 🦉. I find this setup empowering and easy to implement, making it accessible for anyone interested in exploring these technologies.
What You’ll Be Able to Do 🌟
By the end of this setup, you’ll have a no-code playground where you can:
- Trigger workflows using n8n’s visual editor.
- Conduct automated searches across the web with SearXNG.
- Build AI-powered workflows effortlessly, such as a fact-checking bot, news summarizer, or research assistant.
Best of all, it’s 100% local and private, except for the actual AI processing, which remains free as we will utilize Gemini 2.0 Flash. In future blog posts, we will explore how to integrate a model like DeepSeek V3 running locally with ollama into n8n, completing the local setup.
Before we begin, ensure you have Docker installed. This guide will work regardless of your operative system.
If you lack a coding background, the next section may seem daunting—but trust me, it’s easier than you might expect. You’ll soon discover how empowering this skill can be!
Step 1: Create Your Docker Compose File 🏗️
Before solutions like Docker emerged, running software on your computer or a remote server required downloading and setting up multiple components.
Docker simplifies this process. Developers can create services (websites, servers, databases, etc.) and define a file called Dockerfile. While you don’t need to understand the details of its creation, it’s important to know that it contains instructions that any computer with Docker can follow to assemble the software on the fly. This pre-packaging includes everything necessary for the software to function, enhancing replicability.
First, create a folder on your computer (let’s call it workspace) and add an empty file inside it named docker-compose.yml.
workspace
└── docker-compose.ymlThe creators of n8n have released a public GitHub repository called Self-hosted AI Starter Kit. This repository contains a well-structured docker-compose.yml file. We will open it to identify the components we need. If you’re in a hurry, you can use their version directly, which includes other useful services that I may cover in future blog posts. However, breaking things down can be a valuable mental exercise, especially while learning.
In their docker-compose.yml, we will focus on everything related to n8n and its dependency, Postgres. We will filter out components related to ollama (as we will be using the free Gemini 2.0 Flash model instead) and qdrant (a vector database that I prefer to replace with pgvector—stay tuned for more on that).
n8n:
  hostname: n8n
  container_name: n8n
  image: n8nio/n8n:latest
  networks: ['workspace']
  environment:
    - DB_TYPE=postgresdb
    - DB_POSTGRESDB_HOST=postgres
    - DB_POSTGRESDB_USER=root
    - DB_POSTGRESDB_PASSWORD=password
    - N8N_DIAGNOSTICS_ENABLED=false
    - N8N_PERSONALIZATION_ENABLED=false
    - N8N_ENCRYPTION_KEY
    - N8N_USER_MANAGEMENT_JWT_SECRET
  restart: unless-stopped
  ports:
    - 5678:5678
  volumes:
    - n8n_storage:/home/node/.n8n
    - ./n8n/backup:/backup
    - ./shared:/data/shared
  depends_on:
    postgres:
      condition: service_healthy
    n8n-import:
condition: service_completed_successfullyIt depends on Postgres, so we need to include the database in our configuration. It also relies on n8n-import. While optional, it allows us to sync n8n’s workflows and credentials. We will retain it in our configuration.
After running it the first time, you’ll notice a new n8n folder.
workspace
├── docker-compose.yml
└── n8n
    └── backup
        ├── credentials
└── workflowsExposition
- We instruct the container to allow communication from our computer. n8n exposes its functionality on port
5678. This allows us to access n8n locally in our browser athttp://localhost:5678.
ports:
  - 5678:5678
# If you change to "3000:5678",
# it will be "http://localhost:3000"
Copy the following file inside your docker-compose.yml
volumes:
  n8n_storage:
  postgres_storage:

networks:
  workspace:

# The attributes listed in x-n8n are needed both for the service n8n and for n8n-import.
# We define it only once, avoiding stupid typos and having less lines.
# It is mergeable in services with the syntax <<: *service-n8n (see below).
x-n8n: &service-n8n
  image: n8nio/n8n:latest
  networks:
    - workspace
  environment:
    - DB_TYPE=postgresdb
    - DB_POSTGRESDB_HOST=postgres
    - DB_POSTGRESDB_USER=${POSTGRES_USER}
    - DB_POSTGRESDB_PASSWORD=${POSTGRES_PASSWORD}
    - N8N_DIAGNOSTICS_ENABLED=false
    - N8N_PERSONALIZATION_ENABLED=false
    - N8N_ENCRYPTION_KEY
    - N8N_USER_MANAGEMENT_JWT_SECRET

services:
  postgres:
    image: postgres:16-alpine
    hostname: postgres
    networks:
      - workspace
    restart: unless-stopped
    environment:
      - POSTGRES_USER
      - POSTGRES_PASSWORD
      - POSTGRES_DB
    volumes:
      - postgres_storage:/var/lib/postgresql/data
    healthcheck:
      test: ['CMD-SHELL', 'pg_isready -h localhost -U ${POSTGRES_USER} -d ${POSTGRES_DB}']
      interval: 5s
      timeout: 5s
      retries: 10

  # n8n-import only purpose and lifecycle is to read credentials and workflows stored
  # on our computer in the n8n/backup folder and inject them into n8n.
  n8n-import:
    <<: *service-n8n
    hostname: n8n-import
    container_name: n8n-import
    entrypoint: /bin/sh
    command:
      - '-c'
      - 'n8n import:credentials --separate --input=/backup/credentials && n8n import:workflow --separate --input=/backup/workflows'
    volumes:
      - ./n8n/backup:/backup
    depends_on:
      postgres:
        condition: service_healthy

  n8n:
    <<: *service-n8n
    hostname: n8n
    container_name: n8n
    restart: unless-stopped
    ports:
      - 5678:5678
    volumes:
      - n8n_storage:/home/node/.n8n
      - ./n8n/backup:/backup
      - ./shared:/data/shared
    depends_on:
      postgres:
        condition: service_healthy
      n8n-import:
condition: service_completed_successfullyIt’s time to instruct Docker to download and run these services. The first time you do this, it may take a few minutes as it needs to download the necessary components. However, Docker caches these images by default, so subsequent restarts will be much faster.
Open your terminal and run the following command:
docker compose upThis command serves as the ignition for your engine. When you want to shut down the services, simply run docker compose down. If this is your first time executing a setup like this and it works successfully, take a moment to pause and celebrate!
Step 2: Create n8n AI Agent with Gemini 2.0 Flash 🧠
The previous command has filled your terminal with numerous logs. At the end of these logs, you should see the n8n container indicating that it is listening on http://localhost:5678. Enter this URL in your browser, and you should see the n8n authentication screen. For the first time, you will need to create an account. Rest assured, the email and password you provide will not be sent to the internet; they will remain on your machine, stored in the Postgres database we set up earlier.
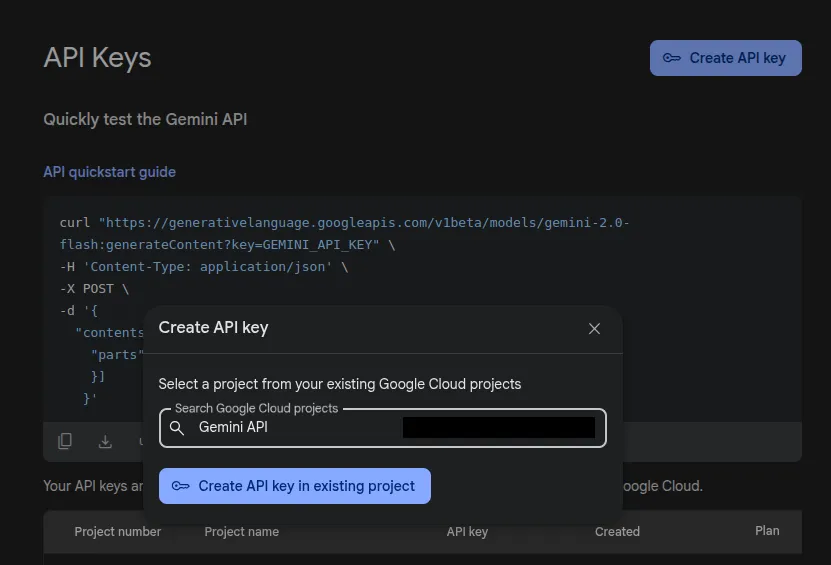
Before we create our AI agent, we need to find a “brain” for it. Visit aistudio.google.com and create a free API key for Gemini 2.0 Flash (it is free at the time of writing).
Make sure to copy the API key, as it will not be displayed again. You will need to provide it when creating the n8n credential.
Next, we will add the following nodes:
- Trigger chat
- AI agent
- Model: Gemini 2.0 Flash
- (optional) Simple Memory
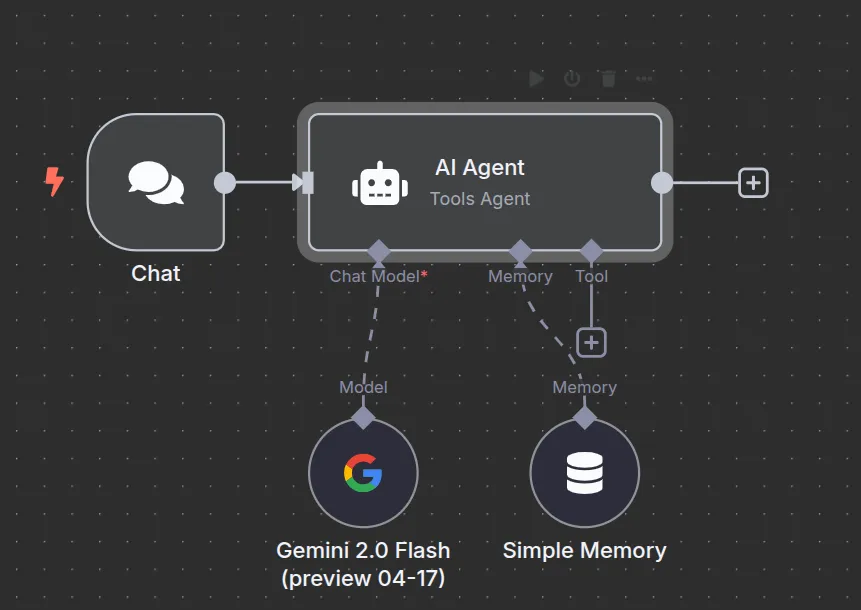
Now, let’s test the chat by asking it something.
Great! By now, you have essentially recreated an interface for that model.
But you know what’s even cooler than a highly intelligent brain trapped in a box? A highly intelligent brain that can retrieve fresh information from the web.
Step 3: Setup locally SearXNG
There is a useful public GitHub repository named searxng/searxng-docker that contains a docker-compose.yml file. Similar to what we did for n8n, we will extract what we need from this repository. In this case, we will be using everything, which will need to be properly merged with the docker-compose.yml we previously assembled.
Create a Caddyfile in the folder.
workspace
├── docker-compose.yml
├── Caddyfile
└── n8n
    └── backup
        ├── credentials
└── workflowsAnd add the following inside.
{
	admin off

	log {
		output stderr
		format filter {
			# Preserves first 8 bits from IPv4 and 32 bits from IPv6
			request>remote_ip ip_mask 8 32
			request>client_ip ip_mask 8 32

			# Remove identificable information
			request>remote_port delete
			request>headers delete
			request>uri query {
				delete url
				delete h
				delete q
			}
		}
	}
}

{$SEARXNG_HOSTNAME}

tls {$SEARXNG_TLS}

encode zstd gzip

@api {
	path /config
	path /healthz
	path /stats/errors
	path /stats/checker
}

@search {
	path /search
}

@imageproxy {
	path /image_proxy
}

@static {
	path /static/*
}

header {
	# CSP (https://content-security-policy.com)
	Content-Security-Policy "upgrade-insecure-requests; default-src 'none'; script-src 'self'; style-src 'self' 'unsafe-inline'; form-action 'self' https://github.com/searxng/searxng/issues/new; font-src 'self'; frame-ancestors 'self'; base-uri 'self'; connect-src 'self' https://overpass-api.de; img-src * data:; frame-src https://www.youtube-nocookie.com https://player.vimeo.com https://www.dailymotion.com https://www.deezer.com https://www.mixcloud.com https://w.soundcloud.com https://embed.spotify.com;"

	# Disable some browser features
	Permissions-Policy "accelerometer=(),camera=(),geolocation=(),gyroscope=(),magnetometer=(),microphone=(),payment=(),usb=()"

	# Set referrer policy
	Referrer-Policy "no-referrer"

	# Force clients to use HTTPS
	Strict-Transport-Security "max-age=31536000"

	# Prevent MIME type sniffing from the declared Content-Type
	X-Content-Type-Options "nosniff"

	# X-Robots-Tag (comment to allow site indexing)
	X-Robots-Tag "noindex, noarchive, nofollow"

	# Remove "Server" header
	-Server
}

header @api {
	Access-Control-Allow-Methods "GET, OPTIONS"
	Access-Control-Allow-Origin "*"
}

route {
	# Cache policy
	header Cache-Control "max-age=0, no-store"
	header @search Cache-Control "max-age=5, private"
	header @imageproxy Cache-Control "max-age=604800, public"
	header @static Cache-Control "max-age=31536000, public, immutable"
}

# SearXNG (uWSGI)
reverse_proxy localhost:8080 {
	header_up X-Forwarded-Port {http.request.port}
	header_up X-Real-IP {http.request.remote.host}

	# https://github.com/searx/searx-docker/issues/24
	header_up Connection "close"
}For the sake of conciseness, here is the final docker-compose.yml. It adds caddy and redis to support to searxng.
volumes:
  n8n_storage:
  postgres_storage:
  caddy-data:
  caddy-config:
  valkey-data2:

networks:
  workspace:

# The attributes listed in x-n8n are needed both for the service n8n and for n8n-import.
# We define it only once, avoiding stupid typos and having less lines.
# It is mergeable in services with the syntax <<: *service-n8n (see below).
x-n8n: &service-n8n
  image: n8nio/n8n:latest
  networks:
    - workspace
  environment:
    - DB_TYPE=postgresdb
    - DB_POSTGRESDB_HOST=postgres
    - DB_POSTGRESDB_USER=${POSTGRES_USER}
    - DB_POSTGRESDB_PASSWORD=${POSTGRES_PASSWORD}
    - N8N_DIAGNOSTICS_ENABLED=false
    - N8N_PERSONALIZATION_ENABLED=false
    - N8N_ENCRYPTION_KEY
    - N8N_USER_MANAGEMENT_JWT_SECRET

services:
  postgres:
    image: postgres:16-alpine
    hostname: postgres
    networks:
      - workspace
    restart: unless-stopped
    environment:
      - POSTGRES_USER
      - POSTGRES_PASSWORD
      - POSTGRES_DB
    volumes:
      - postgres_storage:/var/lib/postgresql/data
    healthcheck:
      test: ['CMD-SHELL', 'pg_isready -h localhost -U ${POSTGRES_USER} -d ${POSTGRES_DB}']
      interval: 5s
      timeout: 5s
      retries: 10

  # n8n-import only purpose and lifecycle is to read credentials and workflows stored
  # on our computer in the n8n/backup folder and inject them into n8n.
  n8n-import:
    <<: *service-n8n
    hostname: n8n-import
    container_name: n8n-import
    entrypoint: /bin/sh
    command:
      - '-c'
      - 'n8n import:credentials --separate --input=/backup/credentials && n8n import:workflow --separate --input=/backup/workflows'
    volumes:
      - ./n8n/backup:/backup
    depends_on:
      postgres:
        condition: service_healthy

  n8n:
    <<: *service-n8n
    hostname: n8n
    container_name: n8n
    restart: unless-stopped
    ports:
      - 5678:5678
    volumes:
      - n8n_storage:/home/node/.n8n
      - ./n8n/backup:/backup
      - ./shared:/data/shared
    depends_on:
      postgres:
        condition: service_healthy
      n8n-import:
        condition: service_completed_successfully

  caddy:
    container_name: caddy
    image: docker.io/library/caddy:2-alpine
    networks:
      - workspace
    restart: unless-stopped
    volumes:
      - ./Caddyfile:/etc/caddy/Caddyfile:ro
      - caddy-data:/data:rw
      - caddy-config:/config:rw
    environment:
      - SEARXNG_HOSTNAME=${SEARXNG_HOSTNAME:-http://localhost:8080}
      - SEARXNG_TLS=${LETSENCRYPT_EMAIL:-internal}
    cap_drop:
      - ALL
    cap_add:
      - NET_BIND_SERVICE
    logging:
      driver: 'json-file'
      options:
        max-size: '1m'
        max-file: '1'

  redis:
    container_name: redis
    image: docker.io/valkey/valkey:8-alpine
    command: valkey-server --save 30 1 --loglevel warning
    restart: unless-stopped
    networks:
      - workspace
    volumes:
      - valkey-data2:/data
    cap_drop:
      - ALL
    cap_add:
      - SETGID
      - SETUID
      - DAC_OVERRIDE
    logging:
      driver: 'json-file'
      options:
        max-size: '1m'
        max-file: '1'

  searxng:
    container_name: searxng
    image: docker.io/searxng/searxng:latest
    restart: unless-stopped
    networks:
      - workspace
    ports:
      - '8080:8080'
    volumes:
      - ./searxng:/etc/searxng:rw
    environment:
      - SEARXNG_BASE_URL=https://${SEARXNG_HOSTNAME:-localhost:8080}/
      - UWSGI_WORKERS=${SEARXNG_UWSGI_WORKERS:-4}
      - UWSGI_THREADS=${SEARXNG_UWSGI_THREADS:-4}
    cap_drop:
      - ALL
    cap_add:
      - CHOWN
      - SETGID
      - SETUID
    logging:
      driver: 'json-file'
      options:
        max-size: '1m'
max-file: '1'First, you should switch off the machine:
docker compose downNow, update the contents of your docker-compose.yml. Finally, restart everything.
docker compose upThis will download the necessary components and make the service available at http://localhost:8080. When you access this URL in your browser, you will find a simple interface to use the service.
After executing an initial query, you will see that it exposes an endpoint GET /search. This endpoint requires a query parameter named q, which should contain the search query. From the side panels, you can also add optional query parameters to control aspects like time_range (with options such as day, month, or year). We can also specify the language and safesearch. For more info about customization refer to SearXNG official docs.
However, there is one thing preventing the n8n AI Agent from utilizing this service: SearXNG needs to communicate in JSON format. Currently, it only returns HTML (which is suitable for visualization in a browser).
Configuring it to return responses in JSON format is straightforward. You may have noticed that, after running searxng, a new folder named searxng has appeared.
workspace
├── docker-compose.yml
├── n8n
│   └── backup
│       ├── credentials
│       └── workflows
└── searxng
    ├── limiter.toml
└── settings.ymlIt is sufficient to edit searxng/settings.yml so that it looks like:
# formats: [html, csv, json, rss]
formats:
  - html
- json # <-- Add thisRemind yourself to docker restart searxng.
We can now add another query parameter named format and set it to json. This will enable the SearXNG service to return responses in JSON format, which is essential for our AI Agent to process the data effectively.
Now, it’s time to integrate this configuration into the AI Agent.
Step 4: Integrate AI Agent with SearXNG
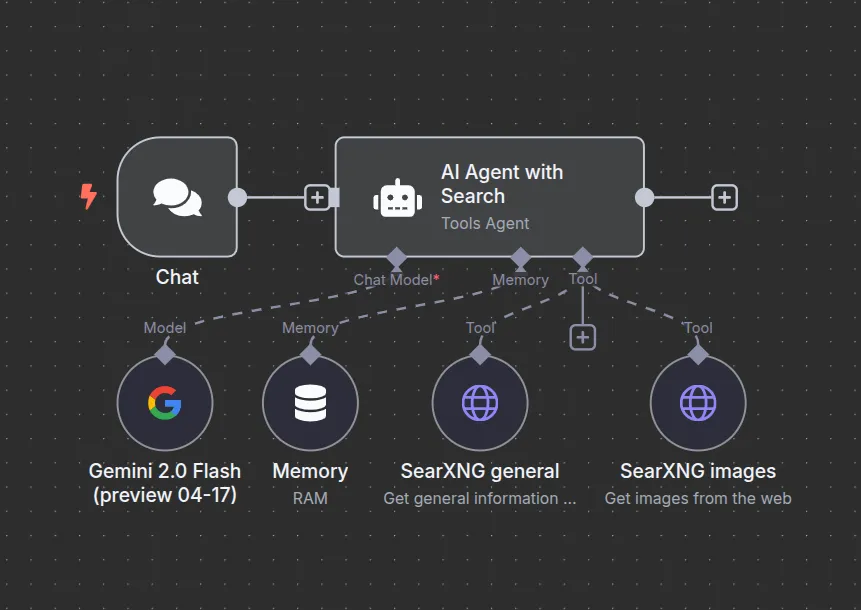
This integration will allow our agent to pull in real-time data from the web, making it smarter and more reliable.
Let’s get down to business and set up an HTTP Request Tool in n8n. Here’s how to do it:
-
Description: This is where you help the AI Agent understand what the tool is for. A good description could be: “Use this tool to fetch fresh data from the web.”
-
URL: Point it to the SearXNG container with the URL:
http://searxng:8080/search. -
Query Parameter
q: Let the AI Agent decide what to search for—this keeps things flexible. -
Query Parameter
json: Set this tojsonto ensure we get the response in the right format.
With the HTTP Request Tool all set up, you can now give your agent some clear instructions:
- Make it a Myth-Busting Agent.
- Always use the web search tool to base its answers on the latest data.
- Ensure it provides sources for every claim it makes.
Here’s a simple system prompt to get you started, but feel free to tweak it to your liking!
You are a Myth-Busting Agent. Your primary function is to identify and debunk common myths and misconceptions by providing accurate information based on data retrieved with the web search tool.
-
Mandatory Web Search Utilization: You must always invoke the web search tool to gather information. Your responses must be based solely on the data retrieved from reliable online sources.
-
Source Attribution: You must always return sources with every claim you make. Provide a link to the source of your information, ensuring that the sources are credible and relevant to the topic at hand.
-
Clarity and Conciseness: Present your findings in a clear and concise manner, making it easy for users to understand the truth behind the myth.
-
Engagement: Encourage users to ask follow-up questions or request clarification on any points you make.
-
Respectful Tone: Maintain a respectful and informative tone, acknowledging that misconceptions can arise from various sources.
This is just a simple example, but I believe it lays the groundwork for you to start exploring this tool. There’s so much potential here, and I’m excited to see what you can create! Over the next few months, I look forward to sharing more insights and learning together as we dive deeper into the possibilities.
Happy automating!
Why This Setup Rocks ✅
- Free & Local – No subscriptions, free API keys, and no hidden limits (at least for single-user usage).
- Modular & Extensible – Easily integrate other tools like local LLMs or vector databases.
- No-Code Friendly – Got a new idea? Assembling something is much easier when you don’t need to code (especially after coding all day for someone else). Instead, you simply connect blocks. While there are complexities involved, I find it useful for prototyping and experimentation. Additionally, it allows you to build chats, multi-step forms, or even expose workflows as endpoints, enabling you to craft your own UI.
- (Not) Private by Design – We are using Gemini 2.0 Flash, which means our data is processed on their servers by definition. This may not necessarily be a problem, depending on your use case. If you need to keep your data 100% private, you can refer back to the Ollama instructions we filtered out during Step 1 and use that instead.
Why Not Use n8n’s Community Nodes?
If you decide to replace n8n with a custom-optimized implementation in the future, you won’t have to do any additional work for the other components like SearXNG or Postgres. You can simply replace the n8n service with your own Python server (or hire someone else to do it for you), and everything else will continue to function as before.
This approach makes it much easier to transition to the cloud if you create a valuable workflow that you wish to make available online. For example, you can copy and paste that docker-compose.yml into Coolify to replicate what we did locally on a remote server.
Got Questions? 💬
This setup is just the starting point—there’s a lot you can build from here.
If you encounter any issues or want help exploring ideas, feel free to drop a comment or connect with me on Twitter/LinkedIn.